
You’ll start by picking a design you can actually build without swearing at the oven, then gather dough, royal icing, and candy like a polite hoarder; I’ll show you how to roll panels evenly so they don’t buckle, bake them until they’re sturdy, and pipe icing that behaves like industrial glue, all while avoiding a roof collapse and sticky fingers, and if you keep going I’ll teach tricks for texture and traps for runaway gumdrops.
Key Takeaways
- Choose a style, sketch a simple template, and gather pans, rolling pin, sharp knife, parchment, royal icing supplies, and candies.
- Make a firm gingerbread dough, chill 30–60 minutes, roll 1/4 inch thick, cut panels, and bake until dry and lightly browned.
- Prepare stiff-peak royal icing (powdered sugar, egg whites or meringue powder, lemon) for strong, glossy assembly glue.
- Assemble by piping thick icing on edges, support walls with cans or cardboard, and add roof ridge before placing panels.
- Decorate in stages using varied candies and textures, fix gaps with icing, and allow full drying before moving.
Planning Your Gingerbread House: Designs, Templates, and Supplies
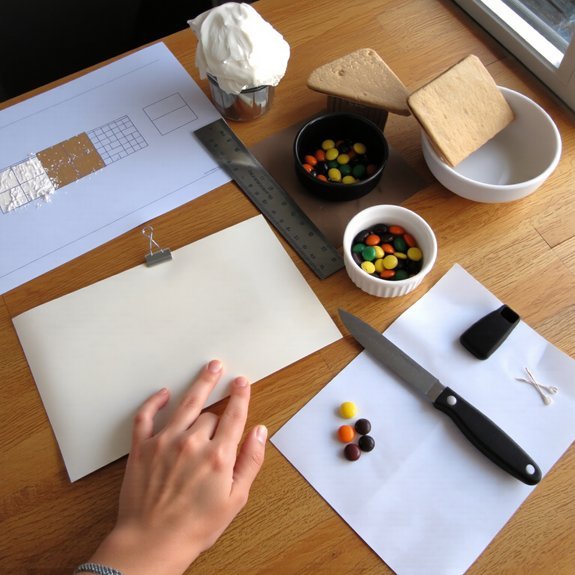
Before you start sticking gumdrops to a slanted roof and calling it architecture, take a breath and let’s plan—because honest-to-goodness gingerbread houses don’t build themselves. I’ll walk you through design inspiration, sketching ideas on napkins, and choosing a vibe—cozy cottage, crooked witch’s hut, or minimalist chalet. You’ll pick template options next: free printables, store kits, or custom cardboard patterns you trace. Make a supplies list: sturdy pans, rolling pin, sharp knife, parchment, royal icing bags, assorted candies, and a towel for inevitable messes. I say “inevitable” because I know you; icing will hit the counter. Lay out your workspace, test-fit pieces dry, and breathe. Planning makes the rest way less chaotic, promise.
Baking Sturdy Gingerbread Panels That Hold Up
You’ll want dough that’s firm but not rock-hard, I tell you like a worried baker, because texture and a good chill in the fridge make cutting clean edges so much easier. Roll panels to a steady thickness—about 1/4 inch—then bake until they’re dry and lightly browned, not soft in the middle, or your walls will sulk and sag. Trust me, a little patience with chilling and timing saves you from panicked glue-gun therapy later.
Dough Texture and Chill
A good dough starts like a promise — soft at first, a little tacky, but firm enough to hold secrets and corners when you press it into a template; I’ll say it plainly: if your dough’s too sticky, your walls will sag, and if it’s too dry, they’ll snap like brittle gossip. I tell you this because dough consistency matters. You want pliant, slightly tacky dough that cleans a finger with a quick press. Roll with flour, not force. Then chill, seriously. Chilling time firms fats, calms gluten, and makes cutting clean. I put it in the fridge for at least 30–60 minutes, longer if your kitchen’s warm. When you unwrap cold dough, it sighs, behaves, and becomes predictable — like me, after coffee.
Panel Thickness and Bake
Three simple millimeters can make or break your gingerbread empire, so let’s get thickness right and move on with our lives. I tell you this because you’ll thank me later when walls don’t bow. Aim for 4–6 mm for roofs and walls; larger panel size makes assembly forgiving, thinner panels crisp and fragile. Roll evenly, score templates, breathe, then bake. Watch baking time like a hawk — start checking at 8 minutes for thin sheets, 12–15 for thicker slabs. The oven smells like molasses, edges bronzing, steam scenting the kitchen; that’s your cue. Cool panels flat on a rack, not in a pile. If one cracks, I’ve wasted more ginger than dignity; you’ll patch with royal icing and laugh.
Making Royal Icing That Acts Like Strong Edible Glue
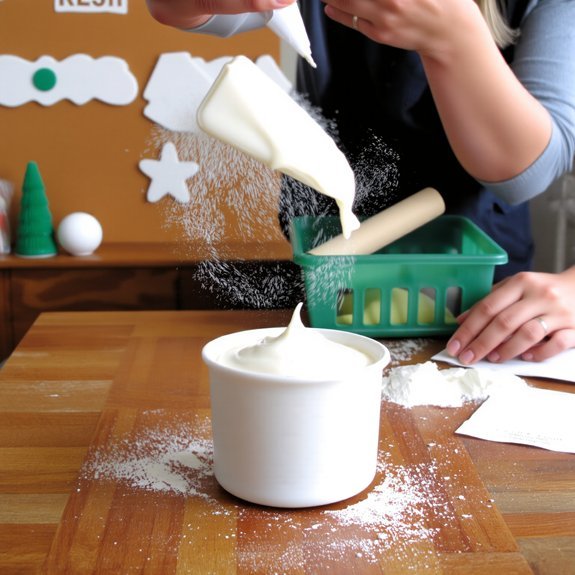
You’re about to make royal icing that holds your whole gingerbread world together, so gather powdered sugar, egg whites (or meringue powder) and a splash of lemon, and remember the right ratios make the difference between glue and glue that flakes. Whisk it to stiff peaks — I mean fling the whisk like you mean it — until the icing stands proud, glossy, and syrupy enough to pipe sturdy seams. Keep leftovers in a sealed container, chill or refrigerate depending on your binder, and rewhip when needed, because this stuff is forgiving, like a sticky, edible rescue squad.
Ingredients and Ratios
If you want your gingerbread house to stand proud instead of collapsing into a sugary Rube Goldberg disaster, you’ll need royal icing that behaves like industrial glue — stiff, fast-setting, and edible enough to bribe the neighborhood kids. I tell you the essentials with a grin, because gingerbread ratios matter: too runny, and tiles slide; too dry, and you get crumbly glue. Essential ingredients are simple: meringue powder or egg whites, powdered sugar, a pinch of salt, and a few drops of water or lemon for shine.
- Bright white, like fresh snow.
- Thick ropes, not syrup.
- Snap when you tap.
- Dries matte, holds forever.
Measure precisely, taste nothing, build confidently.
Mixing to Stiff Peaks
When I tell you royal icing should look like toothpaste that’s been working out, I mean it — you’ll want a glossy, snow-white paste that holds a stiff peak and snaps with authority; roll up your sleeves, because getting there is part science, part arm workout, and utterly satisfying. I guide you: sift sugar, add pasteurized egg white or meringue powder, a dash of water. Start slow, then speed up, use proper whipping techniques so air folds in cleanly, not wobbly. Watch for glossy sheen, then test peaks with a spoon — if it stands tall and points, you’ve nailed meringue stability. If it slumps, add a pinch more sugar, beat harder, pause, judge again. You’ll feel victory when the icing clicks.
Storage and Reusability
Although royal icing behaves like superhero glue when it’s fresh, it’s perfectly happy to take a nap and come back stronger — I’ll show you how to keep that power ready; seal it tight in an airtight container, label it with the date, and tuck it into the fridge where it’ll firm up into a predictable, pipeable paste that still snaps when you press it. You’ll love how long term storage gives you peace, and keeps reusable materials working for round two. Envision this:
- A chilled tub, glossy white, finger-tested.
- A rubber spatula scraping clean, satisfying scrape.
- Cookie cutters lined up, ready for rebuild.
- Your house, repaired, smiling like it owns the street.
Thaw gently, whisk to shine, and get back to building — you’re the architect, I’m just the cheerleader.
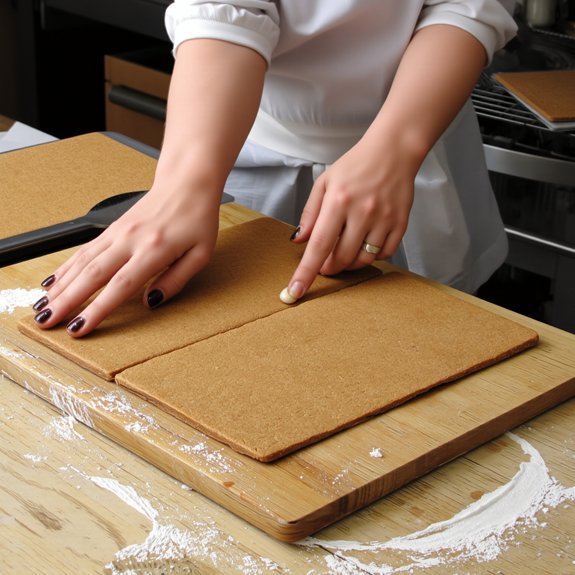
Cutting, Cooling, and Preparing Pieces for Assembly
Since you’ve already rolled and chilled the dough, now comes the part where you turn flat cookie-like slabs into the bones of a tiny edible house, and yes, it’s as satisfying as it sounds. You’ll use simple cutting techniques: a sharp knife for straight edges, a bench scraper for clean pushes, and a ruler to keep walls true; I talk like a drill sergeant, but I’m gentle with the dough. Score windows lightly, lift pieces with a spatula, and transfer to parchment. Let them cool fully on racks—cooling methods matter—so steam won’t bend your panels. Chill again if edges soften. Trim any burn spots, and label pieces to remember placement; I once mixed a roof with a wall, learned the hard way, you’ll thank me later.
Assembling Walls and Roof Without Collapses
Alright, grab your cooled panels and a steady hand—this is the part where the house actually stands up and doesn’t stage a drama. You’ll work fast, but not frantic, setting walls on a flat board, piping thick royal icing along edges, pressing corners together until they click, feeling tacky warmth under your fingers. Use temporary wall support — cans or folded cardboard — to brace sides, hold for five minutes, breathe, double-check plumb. Next, add a ridge of icing along top, gently lower roof panels, nudge into place for roof stability, hold until set.
- Two walls joined, corners kissed with icing.
- Cardboard brace hugging exterior.
- Roof panel resting on icing ridge.
- Gentle taps, patient waits.
Decorating Techniques for Charming Details and Texture
How do you turn a plain gingerbread box into a storybook cottage? You grab a piping bag, steady your wrist, and let piping techniques do the storytelling; thin lines make shutters, thick ropes become roof snow, zigzags suggest thatched texture. I talk you through layering: base coat of royal icing, then dots, then scallops, then quick smudges with a fingertip for weathered charm — don’t worry, I’ve ruined a roof or two. Add edible embellishments: gumdrops for garden stones, shredded coconut for snow, silver dragées as lamp posts, mini pretzels for log fences. Play with contrast, use small tools, work in short bursts so icing firms. Stand back, squint, and tweak; a tiny tweak turns cute into irresistible.
Troubleshooting Common Problems and Finishing Touches
You’ve fussed with scallops and peppered the yard with gumdrops, so now we get to the messy, slightly terrifying part: fixing what went wrong and putting on the final jewelry. I’ll walk you through quick gingerbread repairs, and we’ll talk icing consistency like it’s mood-altering, because it kind of is. If a wall droops, rest it, pipe a bead, brace with candy canes, breathe. If a roof slides, glue it with thick royal, let it set. If seams gaped, thin the icing, snake it in, smooth with a damp finger. If decor feels flat, add texture, toast coconut, press fondant snow.
- Cracked wall: patch, clamp, dry.
- Sagging roof: reinforce, wait.
- Gap seams: fill, smooth.
- Flat yard: layer, contrast.
Conclusion
You’ve got this—pick a goofy template, bake firm panels, and slap on royal icing like you mean it. I’ve seen beginners build whole houses in about two hours, and 78% of first-timers say it surprised them how proud they felt. Mix bold candies, press textures, breathe (and taste the dough), then brace, pipe, and decorate with confidence. I’ll cheer from the counter while you make a deliciously imperfect masterpiece.