Tag: holiday cooking

  • How Do I Make Vegan Holiday Dishes

    How Do I Make Vegan Holiday Dishes

    Like Dickens at a kitchen counter, you can turn humble ingredients into a festive story—I’m serious, you’ll want to narrate this to guests. You’ll swap butter for creamy cashew or oat, use aquafaba for fluff, and roast vegetables until they sing, all while building a show-stopping centerpiece that even skeptics will admire. I’ll guide you through pantry essentials, mains, sides, desserts, and timing—so grab an apron and don’t panic yet.

    Key Takeaways

    • Replace dairy and eggs with cashew or oat creams, aquafaba, and nutritional yeast for texture and cheesy flavor.
    • Build a show-stopping main like herb-crusted nut roast or mushroom-walnut loaf, using searing and resting for depth.
    • Roast seasonal vegetables until caramelized, then toss with citrus, toasted nuts, and bright herbs for savory sides.
    • Offer creamy sides such as garlic white-bean purée or lemony farro, and finish with herb oil or cranberry compote.
    • Prepare desserts like coconut-cream ganache tarts or spiced pear compote, and time prep by batching and reheating gently.

    Essential Swaps and Pantry Staples for Plant-Based Holiday Cooking

    plant based holiday cooking essentials

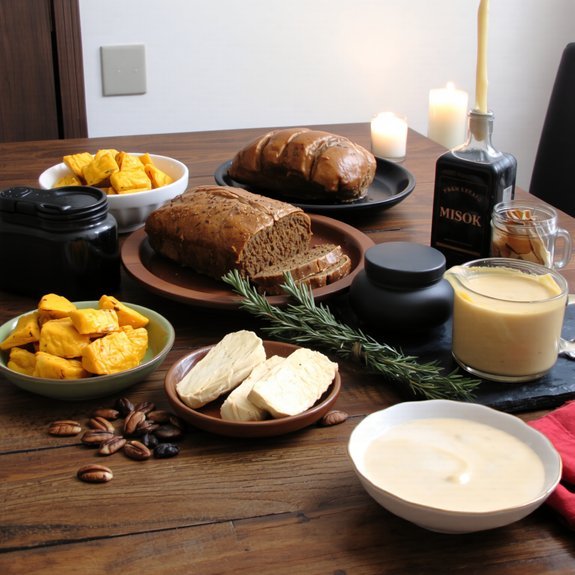
    Because holiday food should feel familiar, not like punishment, I’m here to show you the swaps that actually work—and taste good—without turning your table into a science experiment. You’ll swap dairy for creamy cashew or oat bases, use aquafaba to mimic eggy lift, and stash nutritional yeast for that savory, cheesy wink. Think essential ingredients like miso, tahini, and good olive oil; they rescue texture and soul. Toss in citrus, smoked paprika, and maple as subtle flavor enhancers, don’t be shy, they sing. You’ll toast nuts, sauté shallots until sweet, and rub spices on roasted veg, simple moves that smell like home. I joke a bit, mess up once, then nail it—the payoff is everyone asking for seconds.

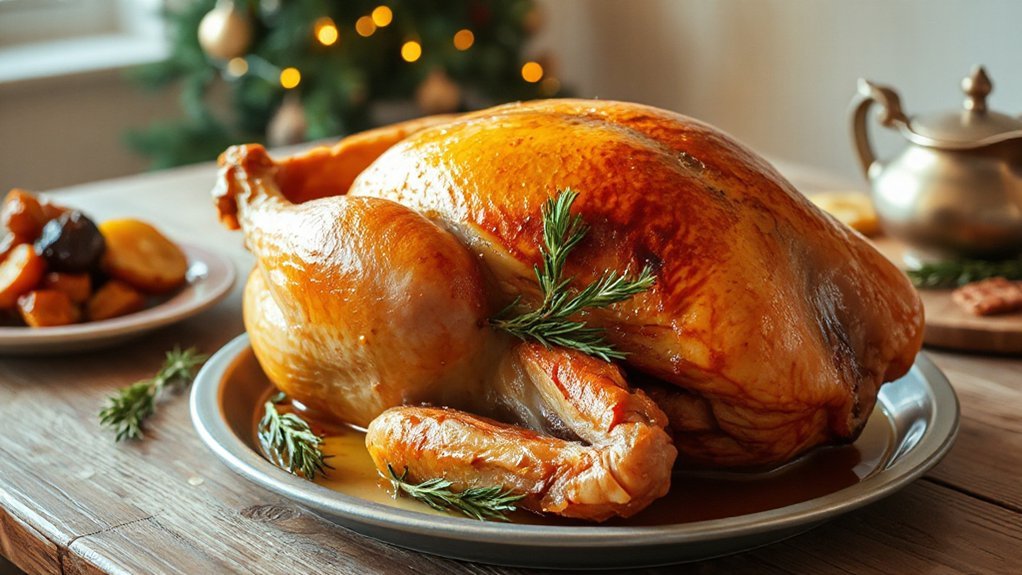
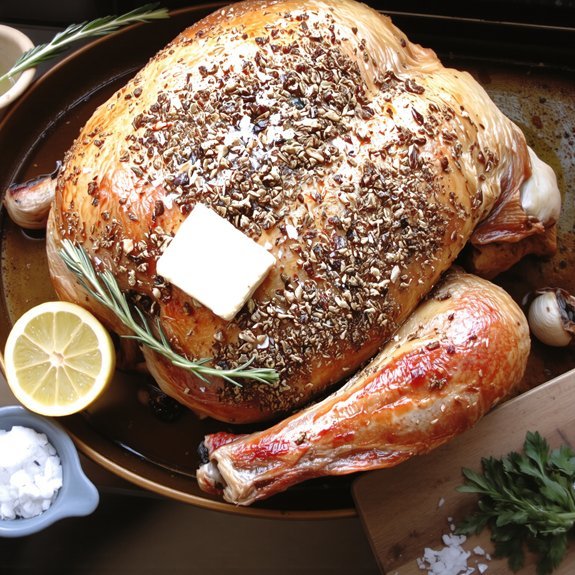
    Show-Stopping Main Courses That Impress a Mixed Crowd

    impressive vegan main courses

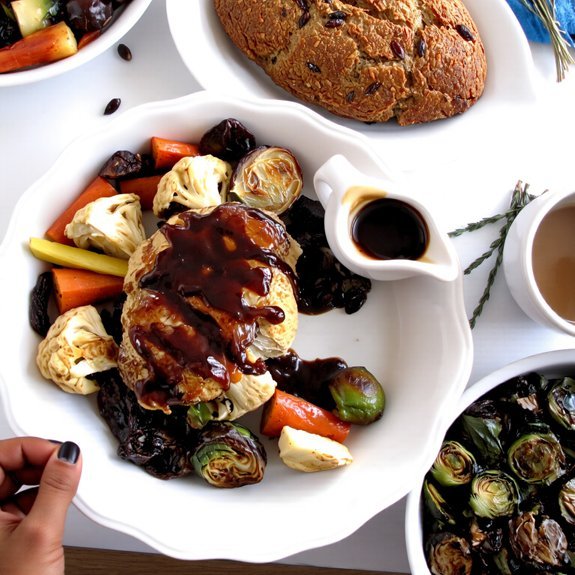
    One show-stopper that never fails is a herb-crusted nut roast that looks fancy but barely breaks a sweat to make—I’ll show you how to get a golden, crunchy exterior and a moist, savory center that even your omnivore aunt will ask about. You’ll also learn to build other vegan roasts that steal the spotlight, from mushroom-walnut loaves to seitan crowns, each with bold seasoning and confident textures. I’ll walk you through searing, glazing, and resting, so flavor locks in and slices hold firm. Don’t skip gourmet toppings—herb oil, tangy cranberry compote, toasted seeds—small additions, huge applause. You’ll plate with swagger, hand it to the table, and watch skeptical faces turn into delighted murmurs.

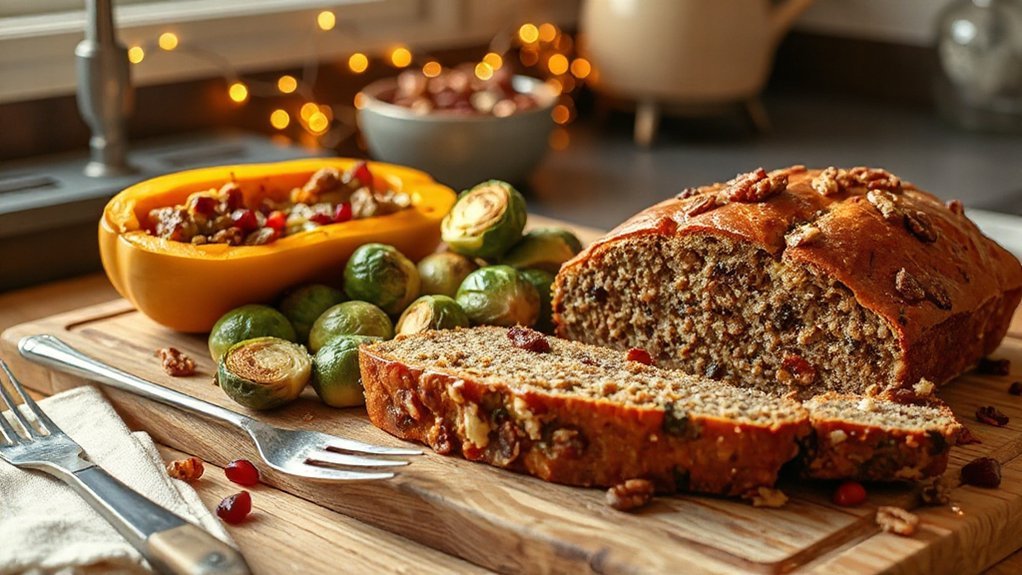
    Crowd-Pleasing Sides and Vegetable-Forward Dishes

    flavorful vegetable side dishes

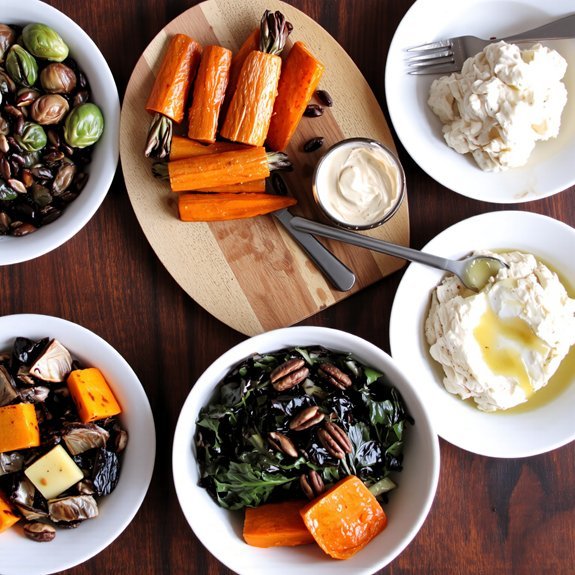
    If you want the sides to steal the show, lean into big flavors and textures that make people forget there’s no meat on the plate—I promise they won’t notice, or they’ll pretend to for manners. I’ll say it plain: roast the seasonal vegetables until their edges caramelize, toss them with bright herbs, a squeeze of citrus, and crunchy toasted nuts. Serve a bowl of flavorful grains—farro, quinoa, or herbed rice—dressed in lemony vinaigrette, studded with dried fruit or savory capers. Add a silky, garlicky bean puree, and a crisp salad with bitter greens and warm vinaigrette. You’ll mix colors, layers, and aromas, hear the compliments, shrug modestly, and secretly plan your encore.

    Decadent Vegan Desserts to Finish the Feast

    You’ve plated the roasted veg, heard the polite oohs, and now you get to close the show with something everyone will actually fight over. You’ll reach for vegan chocolate first, melt it glossy, stir in coconut cream, and suddenly you’ve got silk. Make a tart, a molten cake, or chocolate peppermint bark — think bold, not fussy. Offer spiced pear compotes, citrusy cashew cream, roasted nuts for crunch. Serve warm slices, let steam carry the aroma, watch faces brighten. I’ll nudge you to taste as you go, blame the extra spoonful on quality control. Keep a simple fruit-forward option for wary guests, but don’t skimp on spectacle. These holiday treats should dazzle, comfort, and spark real dessert envy.

    Timing, Prep, and Serving Tips for Stress-Free Holiday Entertaining

    When the oven’s humming and the house smells like cinnamon and triumph, I want you to breathe, make a plan, and trust the clock — not your panic. You’ll map a simple holiday scheduling plan: what cooks when, who brings what, and which dishes can chill. Start with a preparation timeline, write it on a sticky, and stick it to the fridge where guests can’t miss your masterpiece. Do big batches early, freeze sauces, and chop veg the day before — your future self will high-five you. Reheat with steam, serve with flourish, and keep platters warm in a low oven. Ask for help, accept weird requests, and smile — you made this possible, wildly and deliciously.

    Conclusion

    You’ve got this—swap in cashew creams and aquafaba, roast the heck out of roots, and build a nut roast that even your carnivorous uncle will compliment, begrudgingly. I tested a theory: if you pile on texture and bold seasoning, skeptics melt faster than vegan gravy on mashed potatoes. Trust taste, prep ahead, and keep dessert dramatic. I’ll be honest, it’s fun to watch faces change at first bite—mission accomplished.

  • How Do I Roast the Perfect Christmas Turkey

    How Do I Roast the Perfect Christmas Turkey

    You want a turkey that smells like Sunday dinner and slices without a fight, so we’ll make one together, step by step—no soggy skin, no dried-out white meat, just golden crackle and juicy thighs. I’ll walk you through picking the bird, brining like a pro, seasoning with confidence, and nailing roast times and temps, plus carving tricks that save face at the table. Stick with me, and you’ll actually look like you meant to do this.

    Key Takeaways

    • Choose a turkey sized to your guest count and thaw fully in the fridge (about 1 day per 4–5 lbs).
    • Dry-brine or wet-brine ahead, and rub herb butter under the skin for flavor and moist meat.
    • Preheat oven high for initial browning, then roast at 325°F (160°C) about 13–15 minutes per pound unstuffed.
    • Use an instant-read thermometer; remove turkey when thigh reaches 165°F (74°C), tent with foil, and rest 20–30 minutes.
    • Pat turkey dry before roasting, baste sparingly, and finish with a quick broil if skin needs extra crisping.

    Choosing the Right Turkey for Your Table

    choose the right turkey

    One rule I’ve learned the hard way: size matters—so don’t pick a turkey like you’re gambling at Thanksgiving. You’ll want one that fits your oven and table; I pace my counter, feel the heft, imagine slicing a drumstick everyone can reach. Consider heritage breeds if you want richer, more distinctive flavor, they’re smaller but meatier, and they look like the turkey grandparents described. If you care about welfare or cleaner flavor, check organic options, labels matter—read them, don’t guess. Decide fresh or frozen based on timing, but don’t buy something you can’t handle. Picture the bird’s golden skin, hear the oven hum, taste the first crispy bite in your head. Trust me, choose wisely, you’ll thank yourself.

    Thawing, Brining, and Prepping the Bird

    thaw brine prep bird

    You’ll want to plan ahead so the bird thaws safely and evenly, I mean nobody wants a frozen center at dinner. Decide between wet brining for juicy, salty depth or dry brining for crispy skin and simpler prep, and I’ll walk you through both so you’re not guessing. Trim excess fat, tuck the wings, rub in herbs and salt, and imagine that golden skin sizzling as you sling it into the oven.

    Thawing Safely and Evenly

    If you want a roast that tastes like it actually cared about being invited to dinner, start with thawing the bird properly — no shortcuts, no heroic last-minute defrosting in the microwave. I’ll walk you through thawing methods that actually work, and remind you about safe temperatures so you don’t host a bacteria party. Move the turkey from freezer to fridge, on a tray, give it one day per 4–5 pounds, check the cavity for ice. If you’re impatient, submerge the wrapped bird in cold water, changing water every 30 minutes, plan a few hours per pound. Pat it dry, smell it (yes, you’ll know), let it rest in the fridge uncovered a few hours to tighten the skin. That’s your foundation.

    Brining: Wet vs. Dry

    Because brining turns a good turkey into one you brag about without shame, let’s talk about the two schools of flavor: wet and dry. You’ll pick one, commit, and enjoy juicy meat either way. Wet benefits include deep seasoning and reliably moister breast; you’ll dunk the bird in salty, herby bath, fridge it, then feel smug. Dry advantages give you concentrated flavor and crispier skin; you’ll pat the turkey, rub the mix under and over the skin, then wait.

    • Imagine a glossy, golden skin, steam rising as you carve.
    • Picture a herby, saline kiss through every bite.
    • Think crunch, then velvet meat.
    • Feel the aroma fill the kitchen.
    • Hear guests pause, then cheer.

    Trimming and Seasoning Tips

    While the turkey’s still dreaming in the thawing drawer, I start with the small stuff that makes the big stuff sing: trimming loose skin, tucking stray fat, and giving the cavity a quick scrub with paper towels so it’s not a surprise party for extra moisture. You’ll use simple trimming techniques—nip ragged bits, lift skin gently, loosen without tearing, and remove the pop-up truss if present. Rub, don’t scold. Then season boldly. I mix seasoning blends—salt, pepper, garlic powder, thyme, lemon zest—patting under and over the skin so flavor reaches the meat, not just the surface. Stuff aromatics in the cavity, don’t overdo salt, and taste your confidence. That turkey should smell like victory, not regret.

    Seasoning Techniques for Maximum Flavor

    flavorful turkey seasoning techniques

    You’ll start by dry-brining the bird, rubbing salt into the skin and flesh so the meat keeps juices and gains a deep, savory backbone—think roasted, slightly caramelized edges and juicy slices. Then slip herb butter under the skin, a fragrant, melty blanket of rosemary, thyme and lemon that bastes from the inside as the turkey roasts, and don’t forget to season the cavity and the skin well, because those hidden places punch up aroma and browning. I’ll walk you through each step, no chef’s hat required, and we’ll get that golden, flavorful bird on the table with proud, slightly smug smiles.

    Dry-Brine for Depth

    If you want skin that crackles and flesh that tastes like it remembers every spice in your pantry, start with a dry-brine—it’s the secret handshake of roast turkey, and I swear, it works. You rub kosher salt, maybe a pinch of sugar, under and over skin, then you walk away. That pause is magic; salt pulls moisture out, then back in, carrying flavor enhancement deep into meat. You’ll notice firmer skin, cleaner aroma, brighter taste.

    • Coat evenly, don’t go nuclear.
    • Tuck herbs loosely, don’t smear butter (we’ll save that).
    • Rest uncovered in fridge, 24–48 hours.
    • Pat dry before roasting, don’t rinse.
    • Use modest salt, trust time.

    You’ll look smug, and deservedly so.

    Herb Butter Under

    Think of herb butter as the cozy secret you tuck beneath the turkey’s skin, the quiet little flavor engine that turns bland white meat into something people actually fight over. You’ll pick herb selection like you’re casting a tiny supporting cast: rosemary, thyme, sage, parsley — don’t overdo it, let one star shine. For butter preparation, soften room-temperature butter, chop herbs fine, add lemon zest, garlic, salt, and pepper; mash until glossy. Gently separate skin from breast with fingers, shove in small spoonfuls, and smooth so it hugs meat. That butter melts, seasons from the inside, and crisps the skin edges where it peeks out. It’s cozy, clever, and oddly heroic — you did that, chef.

    Season Cavity and Skin

    Let’s get nosy — literally: season the cavity and the skin like you mean it, because flavor loves to hide where you least expect it. You’ll stuff aromatics, but don’t confuse cavity stuffing with overfilling; just enough to perfume, not steam. Pat the skin dry, sprinkle salt, and rub under and over with herb butter for skin crisping that snaps.

    • Tuck lemon halves and thyme into the cavity for bright steam.
    • Loosen skin, smear seasoned butter directly on meat.
    • Salt the surface early for deep seasoning.
    • Pat dry, oil lightly, blast heat for crackle.
    • Rest uncovered to keep skin crisp.

    You’ll smell citrus and thyme, see bronzed skin, slice and grin — job well done.

    Roasting Temperatures, Times, and Methods

    How hot do you want this turkey to sing? I say aim for steady heat, not a scream. For even browning, try roasting methods like high-then-low or steady low heat; both work, I’ve tested them with burnt eyebrows. Preheat to 425°F (220°C) for 20–30 minutes, then drop to 325°F (160°C) for the remainder, or hold at 350°F (175°C) throughout. Cooking times depend on weight and method: roughly 13–15 minutes per pound at 325°F unstuffed, less if you spatchcock. Use a probe, not guesswork, target 165°F (74°C) in the thickest thigh. Baste sparingly, tent if the skin races ahead, and let the oven do the honest work while you practice your victory speech.

    Resting, Carving, and Serving Tips

    After you pull that golden bird from the oven, don’t be tempted to hack straight in—give it a good rest, or you’ll lose half the juices to your cutting board like a rookie. I let it sit, tented loosely with foil, for the recommended resting period, breathe in that roast aroma, and feel smug. When you carve, use confident carving techniques: sharp knife, steady hand, slice against the grain.

    • Let juices redistribute, don’t skip the tent.
    • Remove legs first, then breast, keep bones for gravy.
    • Thin even slices, carve close to the bone.
    • Offer warm gravy and herby butter for serving suggestions.
    • Arrange slices on a warmed platter for classy plating ideas.

    Serve hot, carve with flair, accept applause.

    Troubleshooting Common Turkey Problems

    If your turkey looks more like a sad science experiment than the showpiece you pictured, don’t panic — I’ve sabotaged birds more times than I’ll admit, and I’ll walk you through the fixes. If the turkey skin is soggy, blast it under the broiler for a minute, watch closely, don’t walk away. If the legs cook faster than the breast, tent foil over the thighs, shove a thermometer in the thickest part, and keep checking cooking times, not guesses. If it’s dry, slice against the grain, serve with drippings or gravy, and learn to rest properly next time. If stuffing’s underdone, finish it separately. You’ll save dinner, gleam with triumph, and yes, tell the embarrassing origin story.

    Conclusion

    You’ve got this—your bird will come out golden, juicy, and not at all embarrassed to be the centerpiece. I’ll say it plainly: brine, brown, roast low, rest long. Feel the skin crackle, smell the herbs, let the juices settle. Carve with confidence, pass the gravy, take credit (I’ll wink). If something’s off, it’s character, not failure. Enjoy the applause, the leftovers, and the smug satisfaction of a job deliciously done.