
You’re about to make a wreath, and I’ll walk you through it without the fluff; we’ll pick a sturdy base, stack fragrant greens, and wire on ornaments so nothing droops by New Year’s — you’ll feel the pine needles snap under your fingers and smell citrus ribbon as you tie the bow, and yes, you’ll get a little sap on your sleeve (I do too); stick with me and you’ll have a balanced, weatherproof wreath that actually looks like you meant it, but first—let’s choose the base.
Key Takeaways
- Choose a sturdy wreath base (metal ring, grapevine, or foam) sized for your doorway and secure an armature wire loop for hanging.
- Select a mix of greenery (fresh pine, cedar, eucalyptus or artificial) to vary texture, color, and longevity.
- Layer sturdier greens first, overlap mid-length sprigs like shingles, then tuck softer bits into gaps for depth and balance.
- Add decorations (ornaments, pinecones, berries) strategically in clusters, anchoring with floral wire or hot glue for weatherproofing.
- Finish with a wired ribbon bow, trim tails neatly, and use a strong hook or fishing line loop to hang at eye level.
Choosing the Right Wreath Base
One simple rule: pick a base that can hold up to your ambition, not just your Pinterest fantasies. I’ll say it like a coach: you want sturdiness, not drama. Feel the twig frame’s rough bark, the metal ring’s cool edge, the foam’s spongey give. I’ll show you how wreath materials change the game — grapevine for rustic, wire for sculpted, straw for lightweight cheer. Consider base sizes frankly: small for doors with personality, large for that entryway that needs applause. You’ll test balance, press ribbon into place, listen for wobble. I joke that my first wreath fell like a confused pancake, but you’ll learn to pick the right base, twist wire tight, and finish with confidence. Simple, tactile, satisfying.
Selecting Greenery and Foliage
You’ll decide whether to go fresh—piney, resin-scented and a little sticky—or artificial, which won’t shed on your sweater and lasts for many seasons. I’ll show you how to mix needles, eucalyptus leaves, and glossy holly, balancing textures and colors so your wreath reads cozy but never cluttered. Grab clippers, sniff the greens, and let’s make something that smells like winter and looks like you actually knew what you were doing.
Fresh vs. Artificial
Fresh greenery smells like winter captured in a basket—piney, resinous, a little sharp in the back of your throat—and it’ll make your wreath feel alive; artificial, on the other hand, is the dependable roommate who never drops needles and will survive your cat’s enthusiasm. You’ll notice fresh advantages immediately: scent that fills the room, soft flexible stems you can bend, a rustic imperfect look that screams homemade. But it sheds, it needs water, and it ages like a diva in February. Artificial benefits are tidy, reusable, and you can work on the wreath months ahead without panic. I pick based on where it hangs, how much fuss I’ll tolerate, and whether I want that real-forest thrill or effortless longevity.
Mixing Textures and Colors
If you picked fresh, good — your house smells like a ski lodge and you’ve got pliable stems to work with; if you went artificial, also good — no needles, no drama, you can binge-wreath at 2 a.m. I tell you which greens play nice, and why texture combinations make your wreath sing. You’ll mix soft fir, spiky juniper, glossy holly, and feathery eucalyptus, feeling each under your fingers, hearing a little crunch or none at all.
- Start with a bulky base, like noble fir, for structure and drama.
- Add sprigs of juniper for contrast, and candlewick texture.
- Tuck glossy holly for shiny pops and color blending.
- Finish with eucalyptus for scent and movement.
Picking a Color Scheme and Style
You’re choosing whether your wreath will feel classic and cozy or sleek and modern, and I’ll admit I’m biased toward lots of ribbon and twinkle lights — they make everything friendlier. Pick a color palette next: go traditional with deep greens, reds, and golds that smell like pine and cinnamon, or choose a modern combo—think cool whites, silvers, and a single bold accent—that pops against your door. I’ll help you match tones and textures so your wreath tells the story you want, no judgment if you sneak in a glittery ornament.
Traditional vs. Modern
Because colors set the mood before anyone rings the doorbell, I like to decide my wreath’s personality first—classic or bold, cozy or surprising—so the whole project feels intentional, not accidental. You’ll pick a path: lean into traditional designs with deep greens, berries, pinecones, and velvet ribbons, or go modern with unexpected textures and modern materials like metallic mesh or acrylic ornaments. I talk you through vibe, not math. You’ll touch, tweak, step back, and grin or rework.
- Choose anchors: evergreen base or sleek wire frame.
- Add focal points: pinecones and plaid, or glossy baubles.
- Layer textures: soft needles, crisp metal.
- Finish with mood: vintage charm or clean, minimalist cheer.
Color Palette Selection
When I pick a color palette, I start like a chef tasting salt—small, deliberate, confident—because the first swipe sets the whole recipe. You’ll pick a base, a contrast, and a pop. Think deep forest greens or icy blues, then add copper, berry, or matte gold for punch. Use basic color theory—complements calm, analogous blends soothe, triads energize—so your wreath won’t argue with the mantel. Scan seasonal trends, yes, but don’t be a slave to them; slip in a vintage ornament for personality. Lay swatches on the table, squint, rotate them under light, and step back—trust your gut. If it makes you smile, it’s right. I’ll call that decorator’s proof and move to wiring.
Gathering Tools and Supplies
Alright — let’s gear up. You’re about to gather wreath making essentials, and I’ll walk you through the stash you’ll actually use, not the junk you’ll regret buying. Picture crunchy pine needles, cold wire under your nails, bright ribbon catching light. You’ll want tools that feel steady in your hand, supplies that scream seasonal decorations, and nothing fussy.
- Pruning shears or wire cutters, sharp and reliable.
- A sturdy wreath frame, grapevine or wire, no wobbly drama.
- Assorted greenery and filler—pine, eucalyptus, berries for texture.
- Ribbon, floral wire, hot glue sticks—color and hold in one kit.
I’ll keep you honest, practical, and a little smug about how great this will smell.
Preparing and Wiring the Base
You’ll pick a wreath frame that fits your door and your patience, whether it’s wire, foam, or that rustic twig thing that pokes you. I’ll show you how to wrap and anchor armature wire so the greens don’t wobble off, fingers smelling like pine and wire prickling your skin. Grab your wire cutters, pliers, and floral tape—let’s get the base tight, tidy, and ready for the fun stuff.
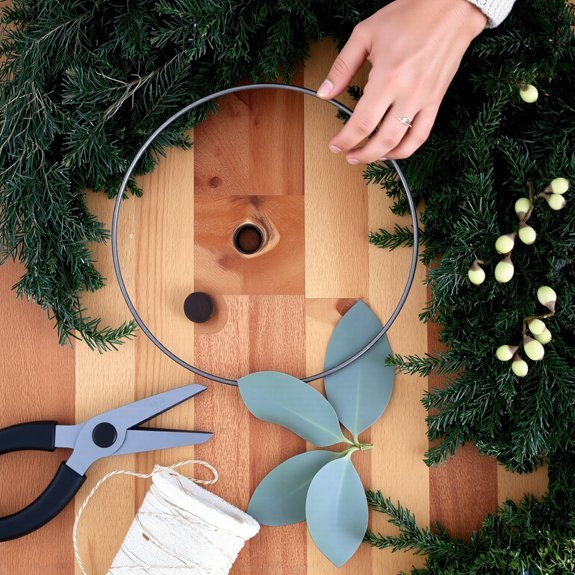
Choosing a Wreath Frame
Because the frame is the wreath’s skeleton, you’ll want one that’s sturdy, easy to work with, and not going to sag like my last attempt (which looked like a sad, festive pancake). You’ll weigh wreath frame options, do a quick materials comparison, and pick what fits your style and patience. I like something I can poke, bend, and not cry over.
- Metal ring: rigid, thin, holds shape, clicky when you tap it.
- Grapevine: rustic, fragrant, forgiving, a few pokes required.
- Foam form: light, smooth, perfect for pins and glue.
- Wire grid: customizable, strong, ideal for heavy ornaments.
Grab gloves, feel the textures, imagine the finished wreath, then choose confidently.
Securing Armature Wire
Grab your wire, roll up your sleeves, and let’s tame this skeleton. You’ll start by measuring a length that wraps the frame twice, you’ll twist the ends to form a secure loop, and you’ll feel the mild snap of wire under your fingers — not painful, dramatic, but honest. I show you simple wreath assembly techniques that don’t pretend to be magical. Anchor the wire at regular intervals, make tight wraps, tuck tails beneath previous coils, and test for wiggle. Use consistent spacing, listen for rattles, adjust until solid. My wire securing methods are straightforward: twist, snug, and clip. You’ll be proud, the base will be honest, and you’ll smile at your own handiwork.
Preparing Wiring Tools
One set of tools will save you from a thready disaster: wire cutters, pliers with good grip, floral wire in two gauges, and a spool of twine for backup—lay them out like a tiny surgical tray and feel oddly official. I tell you this because the right tool types change the whole feel of the job, they make wiring techniques simple instead of stubborn. You’ll hear me mutter as I work, but you’ll also smile at the clean snips.
- Wire cutters: crisp, sharp, no ragged ends.
- Pliers: good grip, small jaws for twisting.
- Floral wire (20 & 24 gauge): stiff and flexible.
- Twine: emergency holds, rustic texture.
Touch the metal, listen for the snap, start confidently.
Layering Greenery for Fullness
If you want a wreath that looks like it swallowed a forest, start by thinking in layers—really, like lasagna but greener and less saucy. I’ll walk you through layering techniques that make a thin hoop look abundant, and show how achieving balance keeps it from tipping into chaos. First, attach a base of sturdier greens, fir or pine, wired tight; that’s your scaffold. Add mid-length sprigs, overlapping like shingles, wire each bundle near the stems. Tuck softer bits—cedar, eucalyptus—into gaps for texture and scent, push stems in, listen for a satisfying thud. Step back, rotate, trim stray tips. If one side screams “too much,” soften it. You’ll end up with depth, scent, motion, and guilt-free bragging rights.
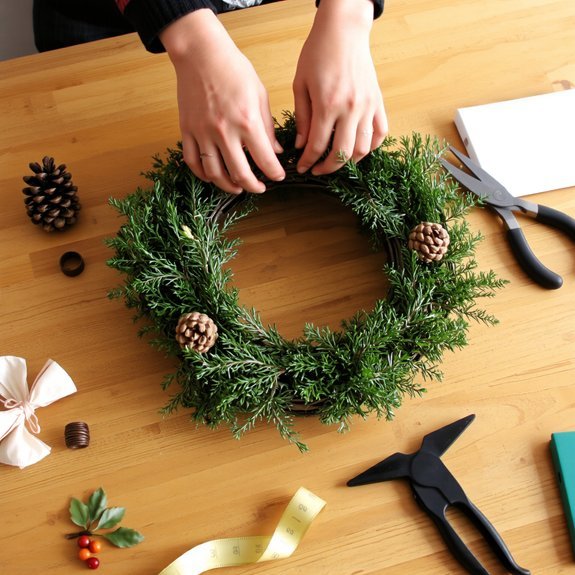
Adding Ornaments and Decorative Accents
Now that your wreath looks like it could hide small woodland creatures, it’s time to dress it up—no tuxedo required. You’ll think about ornament placement like composing a little chorus: balance, rhythm, a pop of surprise. Tuck shiny balls into nooks, cluster matte ones for contrast, and let a pinecone peek out for texture. Handle each piece, feel the cool glass or rough cone, secure it with wire so it won’t wobble when the door slams.
- Cluster three ornaments at varying depths for depth and interest.
- Add natural decorative accents, like cinnamon sticks or dried orange slices.
- Use small picks to anchor lighter pieces deep inside the greens.
- Step back, squint, adjust spacing until it sings.
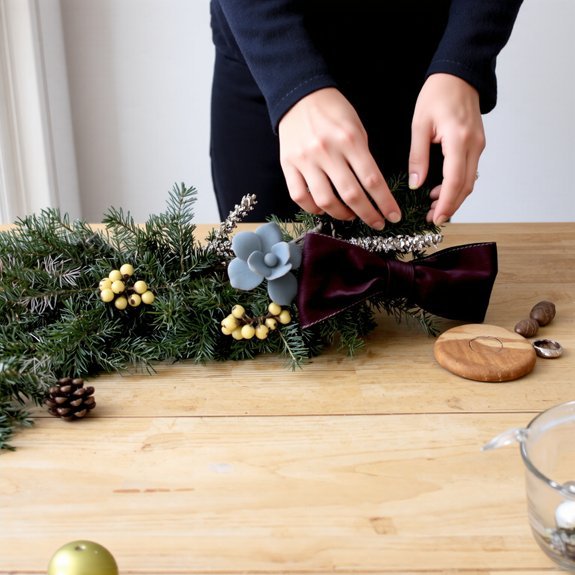
Tying and Styling the Bow
Bows are the grand finale, the hat on your wreath’s head, and they’ll make people stop mid-walk to admire—or at least not notice the squirrel you’ve accidentally invited. I’ll walk you through bow tying so your ribbon looks pro, not panic. Pick wired ribbon for shape, cut tails at an angle, and hold the loops like small presents. Twist the center, cinch with floral wire, flare the loops, trim tails to match. For bow styling, fluff each loop, bend wired edges, and tuck a sprig or ornament into the knot for depth. Step back, squint, adjust—trust your eyes. If it droops, tighten; if it’s too stiff, loosen. You’re aiming for cheerful, not combative.
Weatherproofing and Long-Lasting Tips
Because your wreath will face wind, rain, and the occasional curious raccoon, I treat weatherproofing like giving it a tiny, stylish umbrella. You’ll pick weatherproof materials, seal delicate bits, and think ahead, so your wreath survives sleet and surprise hugs from the porch. I talk you through quick, smart fixes that actually work, no artisanal nonsense.
- Use waterproof glue and wired stems, for strength and clean lines.
- Spray a matte sealant on pine cones and berries, to lock color and scent.
- Wrap ribbon ends in clear tape, then heat-shrink, prevents fraying fast.
- Swap perishable greens weekly, tuck in faux stems for seasonal durability.
Do it right, and you’ll brag to neighbors without shame.
Hanging and Displaying Your Wreath
If you want your wreath to look like it belongs on the front door and not in a sad pile on the porch, think placement first and hardware second. Pick eye level, where passersby meet it, not under a porch light that melts pine needles. I like magnetic hooks for metal doors, over-the-door hangers for ease, and a discreet loop of fishing line for that floating look. Try different hanging techniques, give each a tug, listen for secure silence. For indoor display ideas, hang above the mantel, over a mirror, or on a gallery wall to steal the show. Add a ribbon that matches your door’s color, feel the texture, trim the tail. If it leans, adjust, step back, admire — you nailed it.
Conclusion
You’ve got the gist, and you’re ready—so go grab that metal ring, a clump of fragrant fir, and some ribbon. I’ll cheer from the kitchen while you trim, wire, and tuck, feeling sap on your fingers and pine in the air. Want praise or a hot cocoa afterward? I’ll take both. Hang it at eye level, step back, admire, and know you made something merry, sturdy, and utterly yours.