Tag: safety tips

  • How Do I Make a Winter Emergency Kit

    How Do I Make a Winter Emergency Kit

    Think of a winter emergency kit as your polite way of telling chaos to wait a minute. You’ll thank yourself when the power blinks out, the wind howls, and you’re cozy under wool blankets with a mug that hasn’t gone cold—yes, you’ll want a thermos. I’ll walk you through sensible supplies for home, car, pets, and folks who need extra care, quick storage tips, and a short shopping list so you’re not improvising with canned beans and duct tape.

    Key Takeaways

    • Stock at least three days of water and nonperishable, high‑calorie food for each person and pet.
    • Pack reliable light and heat sources: flashlights/headlamps, extra batteries, warm blankets, and hand warmers.
    • Include basic first aid, prescription medications, and copies of critical documents in a waterproof bag.
    • Prepare a car kit with a shovel, ice scraper, jumper cables or battery pack, reflective triangle, and warm clothing.
    • Organize supplies in labeled, easy‑grab bins and prioritize multipurpose, low‑cost items to stay within budget.

    Why You Need a Winter Emergency Kit

    winter emergency preparedness essentials

    When winter slams the door and the power goes out, you don’t want to be the person who realizes mid-shiver that their car has no blankets and their pantry has one sad jar of pickles. I’m telling you this because winter preparedness isn’t dramatic, it’s smart. You’ll appreciate tidy emergency planning when roads freeze, when heaters cough and die, when you’re boiling snow like a backpacking rookie. Picture the hiss of a kettle, your wool socks hugging your toes, a flashlight scissoring across the ceiling. You’ll calm neighbors, trade jokes, lend a spare charger, feel oddly heroic. Don’t wait for panic to teach you. Make simple choices now, practice once, tweak as life changes, and you’ll sleep warmer knowing you’ve handled the storm like a competent, slightly amused adult.

    Essential Supplies for Your Home

    survival essentials for comfort

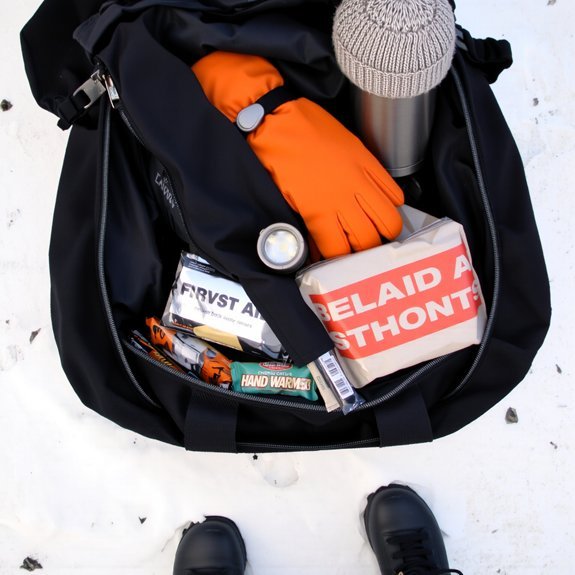
    Okay, let’s talk gear: you’ll want basic survival essentials—water, nonperishable food, flashlights and batteries—stacked where you can grab them with mittened hands. I also keep cozy comforts handy, like warm blankets, a battery heater or hot packs, and a thermos that actually stays hot, because misery plus cold is just rude. Stick these in labeled bins by the door and under the bed, and you’ll thank me when the power goes out and you’re still sipping warm soup.

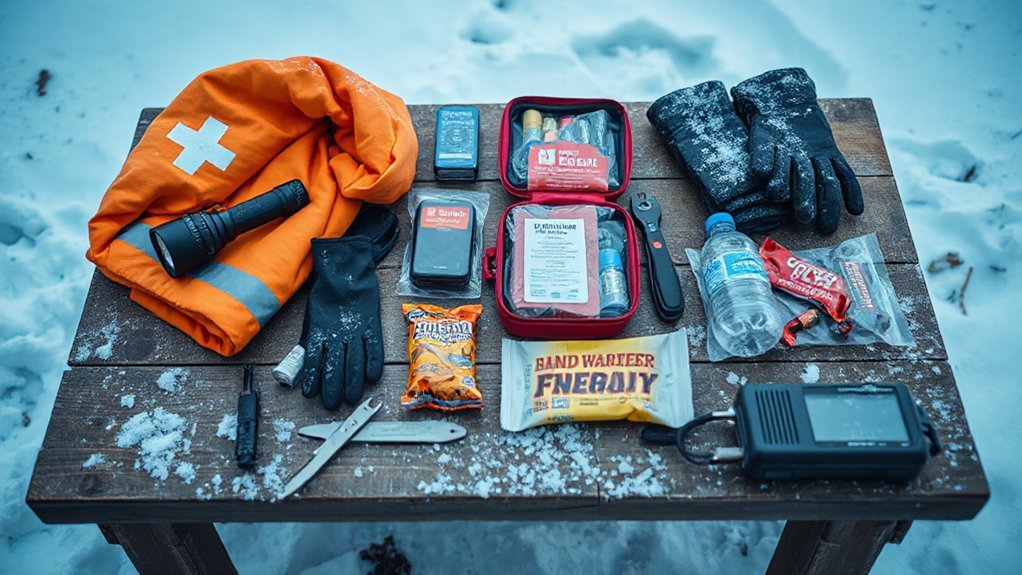
    Basic Survival Essentials

    Pick five things and you’ll feel like a genius; I promise I’m not exaggerating. You need basic first aid supplies, bandages, antiseptic, tweezers, and pain relievers—small things that calm panic and stop bleeding fast. Add reliable light: headlamp, flashlight, fresh batteries. Pack water, three liters per person for 72 hours, plus a stove or means to melt snow. Don’t skimp on food storage: canned goods, ready-to-eat meals, a manual can opener, and high-calorie bars that actually taste decent. Include a multi-tool, waterproof matches, and a warm emergency blanket that smells like nothing, but feels like rescue. Label everything, stash it centrally, tell loved ones where it lives. You’ll sleep easier, and I’ll accept the humble brag.

    Home Comfort Items

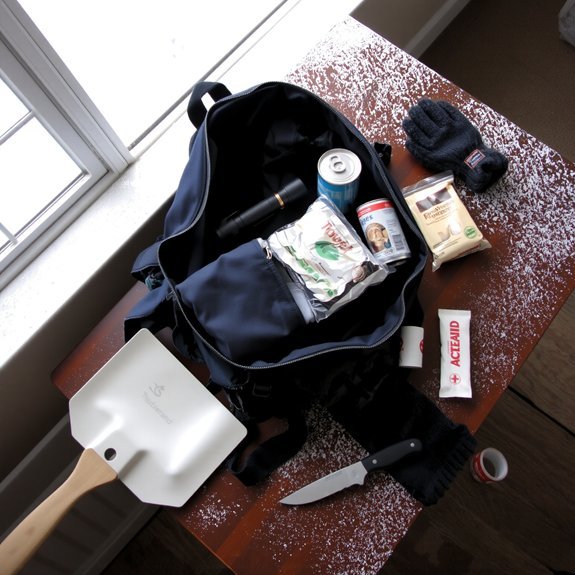
    Even if the power goes out and the house sounds like a slow, confused beast, you can make your space feel cozy instead of desperate—trust me, I’ve learned the hard way. You gather candles, but don’t just light them, place them behind glass lanterns so the draft won’t blow out hope. Layer seating with cozy blankets, toss extra throws on chairs and the floor, make nests where people actually want to sit. If you’ve got a wood stove, stock kindling, gloves, and a poker; if you don’t, seal drafts and use hot water bottles. Keep a shovel, salt, and a battery-powered fan for gentle air circulation when heaters kick back in. Comfort is practical, tactile, and surprisingly morale-boosting.

    What to Keep in Your Car Kit

    essential winter car kit

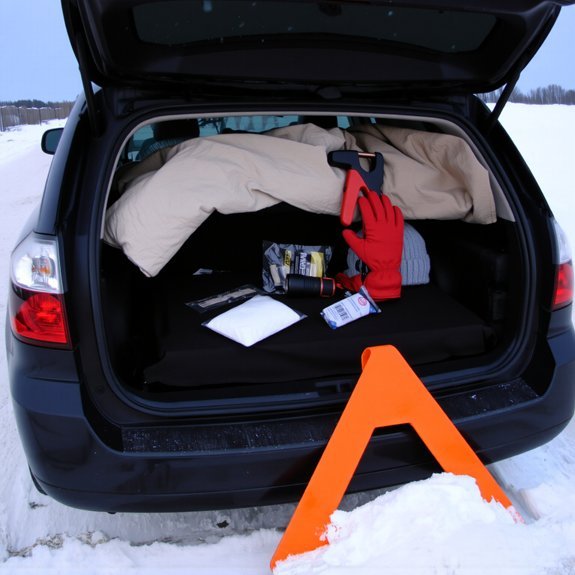
    When the weather turns traitor and your car decides to nap in a drift, you’ll want more than hope in the glove box; I’m talking practical, grab-and-go gear that makes you look like you planned ahead (even if you didn’t). You’ll pack smart car supplies and emergency tools, because cold is dramatic and you don’t need a meltdown. I keep a slim kit under the seat, warm and ready. Feel the crunch of snow, taste the metallic air—now act.

    • Compact shovel and ice scraper
    • Jumper cables and a portable battery pack
    • Warm blanket, hand warmers, high-calorie snacks
    • Flashlight, reflective triangle, multitool

    Grab it, slide it in, and drive like you meant to.

    Supplies for Pets and Vulnerable Family Members

    Pets and people matter, so don’t be the person who forgets the furry and frail when the storm shows up. Pack pet essentials: food in sealed bags, water, bowls, leash, litter or pads, favorite blanket that smells like home, and meds labeled with doses. For vulnerable family members, include prescription lists, extra meds, hearing-aid batteries, glasses, warm socks, and small comfort items that soothe—soft scarf, tea sachets, crossword book. Label everything, stash in easy-to-grab bins, and rotate supplies with expiration dates. I speak from spilled kibble and forgotten pills—learned the hard way. Practice quick check drills, call out names, make a grab list on the fridge. You’ll sleep better knowing everyone, two- and four-legged, is covered.

    Tailoring Your Kit to Climate and Household Needs

    • Insulation and heating packs for freezing nights, or shade tarps and extra water for heat.
    • More food, meds, and blankets if your household size is large, or compact kits for two.
    • Sturdy boots and shovels for heavy snow, sunhats and electrolyte mixes for heatwaves.
    • Backup power sized to devices you actually use, not the ones you wish you did.

    Plan smart, pack specifically, test once.

    Safe Storage and Rotation of Supplies

    Because you’ll actually need these things when snowdrifts or power outages show up, store your kit where you can see and grab it in under a minute — not buried in the attic behind boxes of college T‑shirts you swear you’ll wear again. Put items in clear storage containers with labels, so you can spot batteries, meds, and that weird can opener without excavating. Keep heavy stuff low, easy to lift when your hands are numb. I check dates monthly, swap frozen meals before they frost over, and write restock notes on the lid. Supply rotation is simple: first in, first out. Use small checklist cards, mark expiration dates in bright ink, and practice a quick grab — you’ll feel smarter than the storm, even if you’re wearing two mismatched gloves.

    Budget-Friendly Tips and Shopping Checklist

    You can build a solid winter kit without emptying your wallet, so grab a tote, squint at price tags, and hunt for the smart basics—water, a warm blanket, batteries, a flashlight, and ready-to-eat food. I’ll show you a shopping checklist that skips the fluff and nails the essentials, plus a few low-cost extras that actually make cold nights bearable (think hand warmers and a battery-powered lantern). Trust me, you’ll feel proud and a little smug when a storm hits and you’re the one offering hot cocoa.

    Low-Cost Essential Items

    Think of this list as your cold-weather lifeline — cheap, practical, and annoyingly effective. I’ll show you low cost alternatives and budget friendly options that don’t feel like compromise. You’ll get warm, dry, and fed without selling a kidney.

    • Mylar emergency blanket, compact and shiny, traps heat like a tiny tin foil hug.
    • Hand warmers, single-use or reusable, slip into gloves and make toes stop protesting.
    • LED headlamp with extra batteries, bright, hands-free, and annoyingly reliable.
    • Non-perishable high-calorie bars, dense, salty or sweet, melt-in-your-mouth energy on demand.

    I talk like a friend who’s been stuck on a snowy shoulder, I list what works, and I’m blunt: buy these, stash them, repeat.

    Smart Shopping Checklist

    While you’re staring at a cart full of shiny options and budget guilt, let me steer you straight: I’ve boiled this into a no-nonsense checklist that saves money and your backside. You’ll buy multipurpose winter gear, not impulse glitter. Pick a warm hat, insulated gloves, and layered socks that smell like victory not wool. Grab emergency tools: a hand-crank flashlight, compact shovel, scraper, and a sturdy tow strap. Compare prices, read one honest review, then walk away and sleep on it. Hit dollar aisles for zip ties, duct tape, and my beloved chemical warmers. Bundle purchases at one store to dodge shipping fees. Keep receipts in a labeled pouch. Repeat: essentials first, frills never. You’ll thank me later.

    Conclusion

    You might think a winter kit is overkill — I once did, until I sat in a silent, snowed-in car, breathing cold air and regretting my optimism. You’ll feel calmer with water, blankets, a flashlight, meds, and a shovel at hand, and your dog will thank you with sloppy kisses. Pack smart, label bins, rotate supplies, and test gear. Trust me, a little prep turns panic into a hot cup of saved sanity.

  • How Do I Put up Christmas Lights Safely

    How Do I Put up Christmas Lights Safely

    You’ll be amazed how a string of tiny LED bulbs can turn your sagging eaves into a festive runway, but let’s get it up without a trip to urgent care. I’ll walk you through picking the right lights, testing frayed cords, and climbing a ladder like a pro—three points of contact, remember—while we laugh at my own crooked first attempt; stick around and you’ll have a safe, weatherproof display that actually stays lit.

    Key Takeaways

    • Inspect all light strands, cords, and plugs for damage, fraying, or exposed wires before installation.
    • Use outdoor-rated LED lights, weatherproof plugs, and insulated extension cords to reduce fire and shock risk.
    • Plug into GFCI-protected outlets and avoid overloading circuits or daisy-chaining multiple extension cords.
    • Use a stable, non-conductive ladder with a spotter, maintain three points of contact, and avoid overreaching.
    • Secure lights with clips or hooks (no nails or staples), keep connections off the ground, and unplug during severe weather.

    Choosing the Right Lights and Equipment

    smart lighting setup essentials

    If you’re anything like me, you want lights that look magical and don’t short out the neighborhood, so start by picking bulbs that match the job. You’ll want LED options for stringing gutters, wreaths, and trees, because they’re cool to touch, won’t melt plastic clips, and deliver serious energy efficiency — your wallet will thank you. Choose outdoor-rated strands with sturdy sockets, weatherproof plugs, and the right length so you’re not juggling excess slack. Grab good clips, insulated extension cords, and a reliable ladder with rubber feet; don’t improvise with tape and hope. I say this from experience, while nursing a minor ego bruise and a coffee stain, but trust me: pick smart gear, set it up calmly, and enjoy the glow.

    Inspecting Lights, Cords, and Connections

    inspect lights and cords

    Start with one careful sweep of every strand, cord, and plug—don’t rush it like you’re about to bail on a boring party. Run your fingers along bulbs, check for cracks, discoloration, or gritty bits that smell like bad wiring. Tug gently at connections, listen for wiggle, spot loose prongs. It’s basic light maintenance, you’ll thank me later.

    1. Look for frayed insulation, exposed wire, or melted spots; if you see any, toss that strand.
    2. Test each bulb and socket on a known-good outlet; swap bulbs, watch for flicker or heat.
    3. Coil intact lines neatly for cord storage, avoid tight knots, label sets so you don’t reenact a holiday crime scene.

    You’ll stay safe, avoid sparks, and keep the magic humming.

    Planning Your Layout and Power Sources

    plan zones count strands

    You’ll want to break your house into tidy layout zones — roofline, bushes, porch — so you can picture the show before you start climbing. I’ll help you map each zone, count the strands, and sketch where outlets or timers need to sit, so you don’t end up with a tangled glitter bomb at midnight. Check your circuit capacity too, don’t overload one breaker, or you’ll be the neighborhood mystery when the lights go out.

    Choose Layout Zones

    Three zones usually do the trick: roofline, yard, and power hub — and I’ll show you how to tame each one without frying the neighborhood. I pick layout styles that read like a map, then assign clear zone designations so you don’t end up chasing extension cords at midnight. Picture yourself on a ladder, crisp cold air, lights in hand — plan feels good.

    1. Roofline — trace eaves, corners, gutters; keep clips every 12–18 inches.
    2. Yard — wrap shrubs, outline paths, anchor stakes for stakes that don’t wander.
    3. Power hub — centralize plugs, run cord channels, label each string.

    You’ll work smarter, not harder, and laugh when the neighbors ask how you did it.

    Assess Power Capacity

    If you want your display to glow without tripping every breaker on the block, we’ve got to size up the power like pros—briefcase-open, clipboard-out, but with less formality and more hot cocoa. You’ll count bulbs and strings, note wattage per strand, then total the power load. Walk the yard, plug in a tester, feel for warm cords, sniff for that “too-much-Christmas” ozone—okay, maybe don’t sniff too hard. Check your panel, read labels, and respect circuit limitations; don’t be clever with extension cords. If a circuit’s near max, split the lights across circuits, or use LED strands that sip juice. Label everything. I’ll remind you: safety’s boring until it isn’t, so plan smart, laugh at your ladder mishaps, and stay powered-up.

    Ladder Safety and Working at Heights

    When I haul out the ladder, I treat it like a partner in crime: steady, reliable, and not given to surprises, because surprises on a roof make my knees go numb. You double-check ladder stability, set feet on firm ground, and lock every hinge; you smell cold metal, feel rubber feet bite the concrete, hear wind negotiate your balance. Keep height awareness front and center, measure reach, never tiptoe at the top. Use a spotter, clip your tool bag on, and talk through each move.

    1. Inspect rungs, locks, and feet before climbing, replace damaged parts.
    2. Angle the ladder properly, three points of contact always.
    3. Wear grippy shoes, avoid carrying bulbs in your hands.

    Preventing Electrical Hazards and Overloads

    Okay, here’s the fun, not-so-flashy part: check your light set ratings so you know what each strand can handle, and don’t guess — read the little tag like it’s a secret map. Plug into GFCI-protected outlets outdoors, feel for that reassuring click, and if you’re using extension cords keep them single runs — no daisy-chaining like it’s a holiday conga line. I’ll say it straight: overloads are boring but dangerous, so split loads, use rated cords, and keep your display bright, not toasting.

    Check Light Set Ratings

    Because trusting a tangled ball of bulbs and a snowman clip to the mystery powers of your outlet feels like a dare, you’re going to check the light set ratings first — I promise it’s not boring. You’ll flip the strand over, feel the plastic, read the tiny print, and decide. Look for voltage and amp info, note whether it’s indoor or outdoor, and compare light set types — incandescent draws more, LEDs save power, they brag about energy efficiency for good reason.

    1. Confirm voltage and maximum amps — don’t guess, calculate.
    2. Count connected strands allowed on one circuit — follow the label.
    3. Inspect for damage, frayed cord, missing plugs — replace if unsure.

    Do it now, you’ll thank me when the breaker stays calm.

    Use Gfci-Protected Outlets

    If you want your holiday lights to stay merry and not singe your eyebrows, plug into a GFCI-protected outlet — seriously, it’s like a tiny electrical bouncer watching for trouble. I tell you this because GFCI benefits aren’t hype; they cut power fast if water or a frayed wire tries to ruin your night. Walk the yard, note Outlet locations before you hang anything, plan routes, and picture extension cords like tightrope lines. You’ll feel the cold, hear the ladder creak, and appreciate that reset button when a gust trips it. Test the outlet first, press Test, then Reset, like a secret handshake. If something trips, don’t curse—investigate, fix the fault, then smile and plug back in.

    Avoid Daisy-Chaining Cords

    You’ve already hunted down the GFCI outlets and given them the secret handshake, so now listen up — don’t turn your yard into a spaghetti monster of extension cords. You’ll tempt fate, and overload issues, if you keep daisy-chaining lights like it’s a DIY trophy. I’ve tripped breakers, smelled that telltale ozone, and vowed never again.

    1. Count plugs: know each string’s amperage, don’t guess, avoid daisy chain risks by spreading load across circuits.
    2. Use rated cords: heavy-duty, outdoor, UL-listed, keep connections off wet ground, tuck them under rubber mats.
    3. Plug limit: follow manufacturer maxs, use power strips with overload protection, label runs so you won’t recreate the mess next year.

    Weatherproofing and Securing Your Display

    When the forecast says rain, wind, or that weird sleety drizzle that sneaks up and ruins everything, don’t sigh and hope for the best — get ruthless about weatherproofing and securing your display. I’m blunt: use weatherproof materials, silicone-seal connectors, and outdoor-rated cords. Run lights through drip loops, tuck plugs up off the ground, and wrap exposed joins with proper tape, not duct tape (we’ve all learned that lesson).

    For securing methods, grab clips, zip ties, and a stout staple gun with insulated staples, and fasten to gutters, fascia, or stakes, not fragile shingles. Check lines for movement, tug gently, listen for rattles. When wind comes, you’ll be glad you did. Finish with a walkaround, hot cocoa optional, ego intact.

    Conclusion

    You’ve got this. I’ll admit, I once spent an hour untangling lights that looked like a Christmas octopus, but after you inspect cords, pick LEDs, clip—don’t nail—everything in place, and use a GFCI outlet, it’s smooth sailing. Picture 350 steady LEDs per strand, glowing like a tiny galaxy on your roof. Keep three points of contact, don’t overreach, and check for heat; if something smells off, unplug and fix it. Safe holiday glow.